


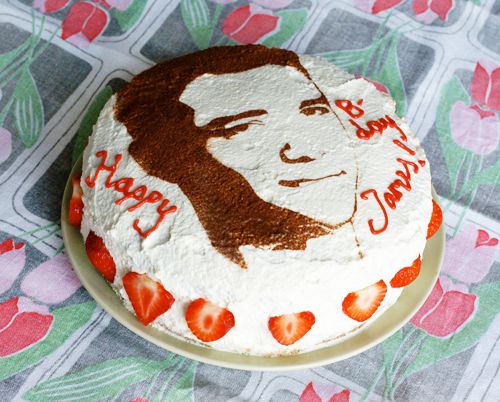
What's more thoughtful and fun than a face cake on your birthday? The answer is a homemade face cake! I came up with the idea of a homemade portrait cake when my fiancé James turned 30 a couple of years ago. I wanted to surprise him with a really special cake, but I didn't want to order a cake with his photograph from our local cake shop since they're very expensive and, in my opinion, not very tasty. So the idea of making my own cake with a picture of James was formed. After some thinking my idea came to life. Two years later our friends are still talking about that cake, it is an understatement to say that it was a success. Here's how i did it...
Step 1: The Cake
The inside of your cake can be any flavour you like, but the outside must be covered in whipped cream or a white creamy frosting. The top of your cake needs to be flat for best result.
This is the recipe for my Strawberry and White Chocolate Face Cake:
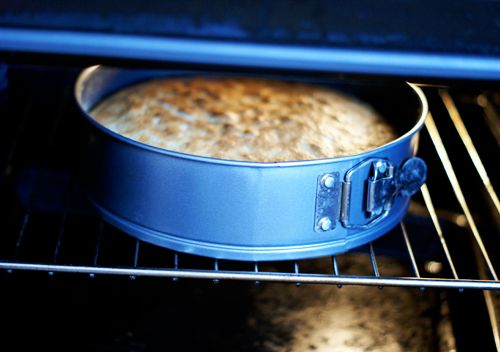
1. Make a simple sponge cake and cut it in half horizontally, or buy a ready-made layered sponge.
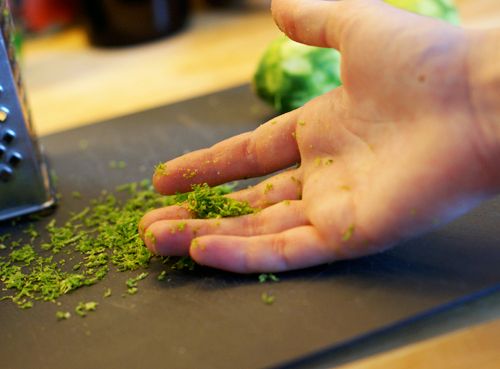
2. Grate the zest of a lime, make sure you don't get any of the white pith.
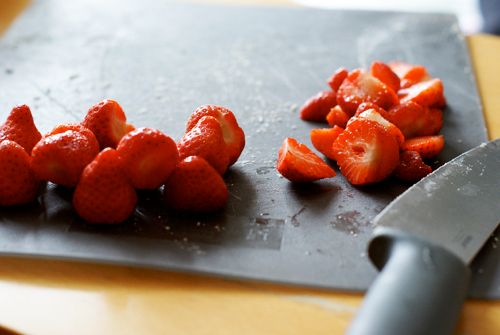
3. Slice a handful of strawberries.
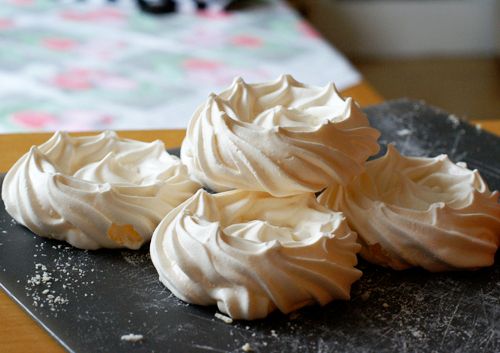
4. Break five meringues into smaller parts.
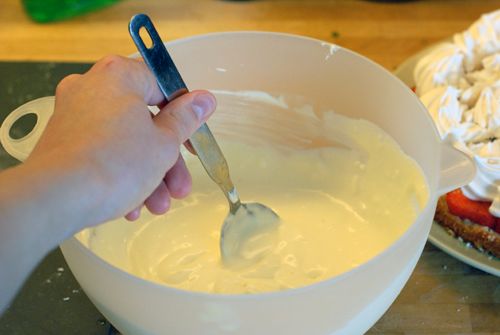
5. To make white chocolate and mascarpone mousse:
Bring 150 ml double cream to the boil, break 100 g of white chocolate into small pieces and let them melt in the cream. Stir and let the mix cool down. When it's completely cool, whisk with an electrical mixer. Stir in 100 ml of mascarpone.
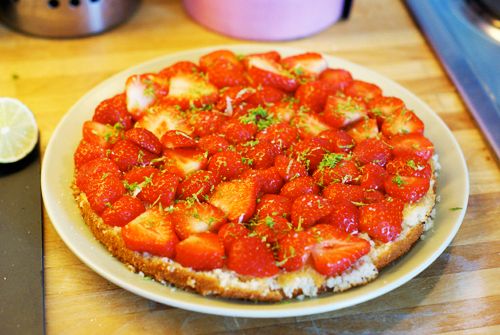
6. Arrange the strawberry slices on the first layer of sponge. Sprinkle the lime zest on top.

7. Add the meringue...
And the white chocolate/mascarpone mix.

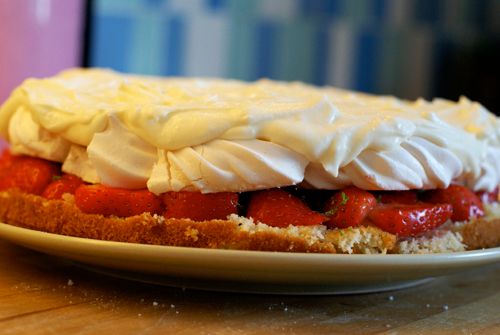
8. Place the second cake layer on top...
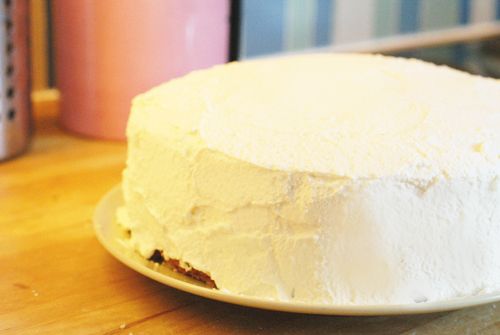
And cover the whole thing with whipped cream or frosting, I use whipped cream.
Step 2: The Face
It's takes a little time and effort to create the portrait, but it's so worth it!
You will need:
- A good photo of the birthday person's face (good contrast and no weird shadows)
- some kind of image editing software
- a scalpel
- cocoa powder
- a sieve.
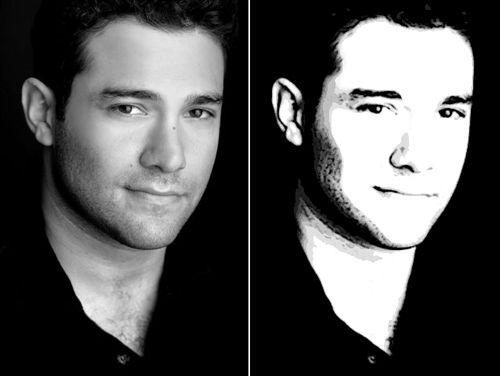
1. Start with making the photo black and white, then you want to enhance the contrast between light and dark so much that the facial features consists of dark shadows and white parts. To do this I used a filter in Photoshop called "poster edges", but you just have to play around to see what works best on your image.
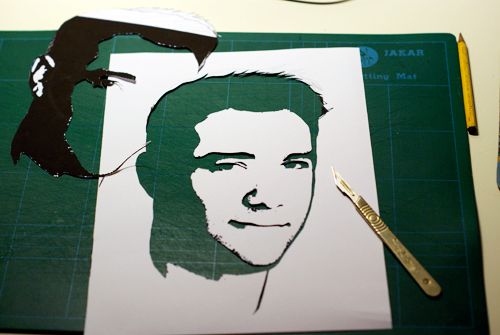
2. Cut out the dark parts with a scalpel to make a stencil. Don't worry if you make a mistake or if the face "falls out" because you have cut all the way around it (like I did), just use a little tape to fix it. Remember you are going to use the frame and the "holes", not the dark bits you are cutting out.
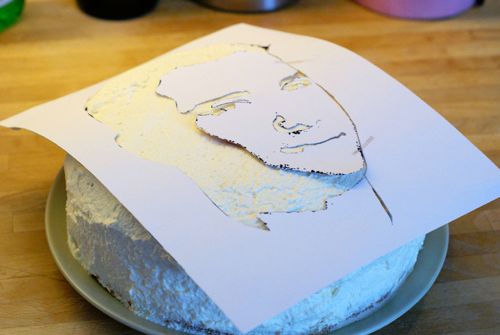
3. Place the stencil on top of your cake, or if you have someone to help you they can hold it just above the cake.
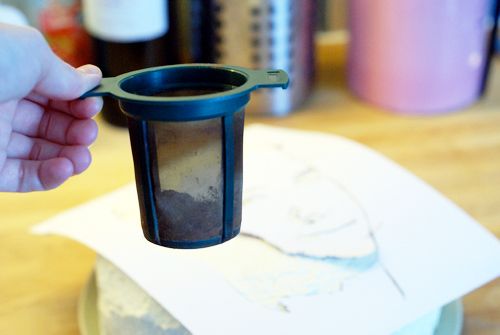
4. Sift the cocoa over the stencil, I used a tea sieve which worked really well. Don't use too much cocoa, you want a thin layer for best result.
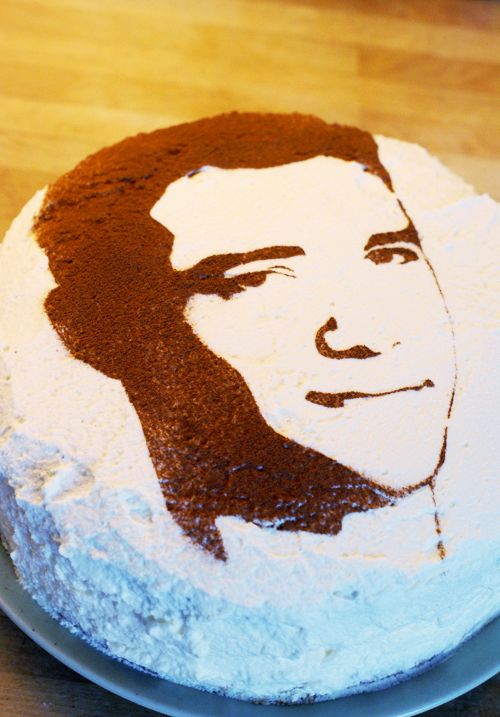
5. Remove the stencil carefully and voilà!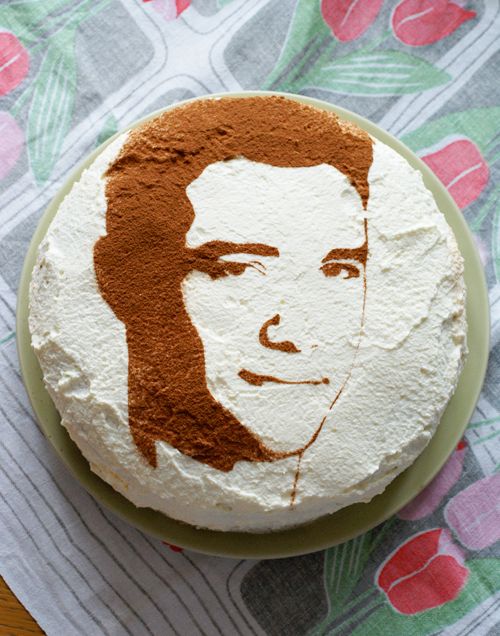
A home made portrait cake.
7. Decorate the cake as you wish, and surprise your loved one with it!
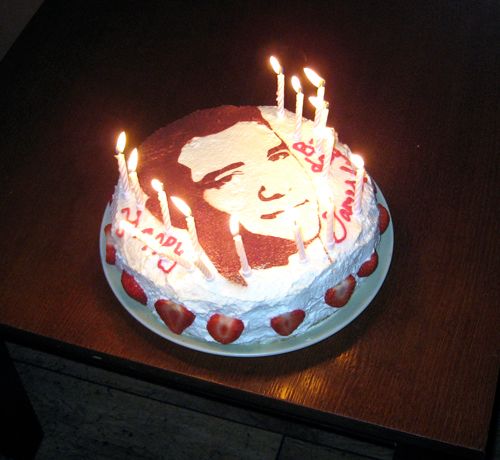
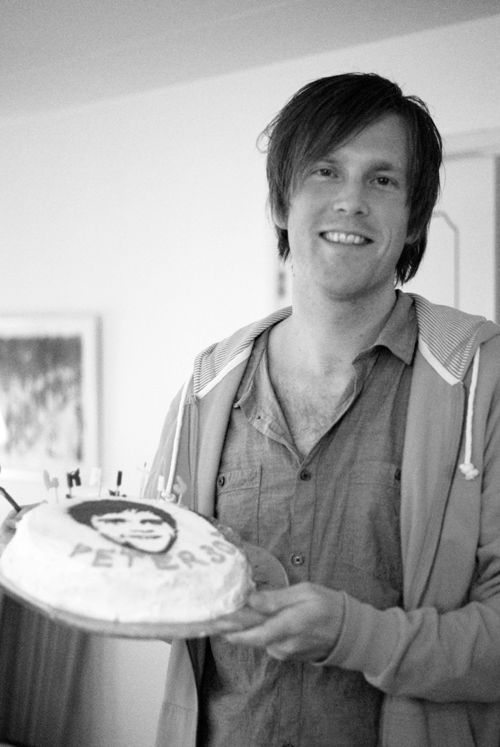
When I brought out the cake at James' party everyone was in awe and James was so excited and thankful!
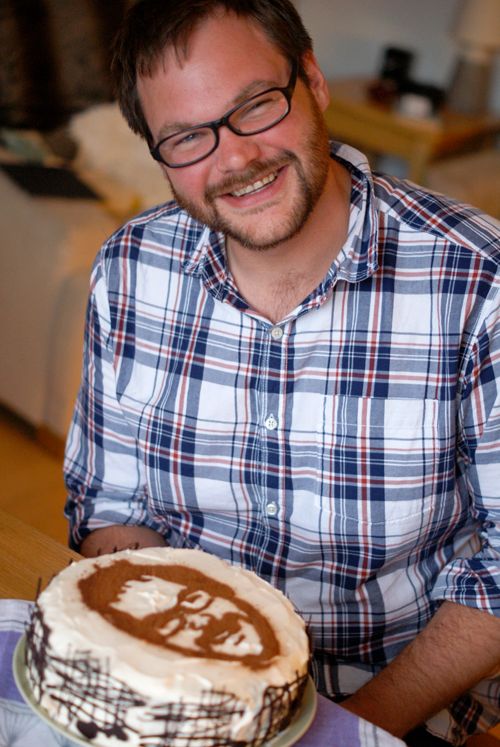
Here are some other face cakes I've made. It's so much fun to see the birthday person's reaction when you give them their cake and always very appreciated.
Happy face-caking!


65 Comments:
genious! I'm def pinning this too, thanks!
Thanks Libby! :)
Aww, that looks amazing! Cool idea :)
And the cake itself looks yummy, I love meringue!
xx
this is good. really, really good.
-jocee <3
That is so neat! You are so talented!
You're so talented. Love it!
♥ sécia
www.petiteinsanities.blogspot.com
This is amaizing! I wanna try to make one now hehehe. Thank you for sharing this, I read your older post with you cake face on, and I always thought.. oh thats cute, and always wonder how to make 'em.
Thank you for sharing.. :-)
S
wow-what patience you have to do these. they all look stunningly like their face "mates". impressive.
Awesome :D
Wow! I wish I've seen it sooner. I was my boyfriend's birthday yesterday and it would be so cool to made him such a cake.
Thanks for sharing! :-)
This is SO cool, although I'm not so sure mine will turn out as good as yours! Well worth the effort though, Jurgen would love this :)
xxx
Jenna
That is amazing. Pretty sure I don't have the patience to do this, but now I know it is possible. :)
this is so fantastic that you did a tutorial! tom's 30th is coming and i think he might need this!
xo,
cb
my goodness, this sounds really really good. I love mascarpone cheese.
Stop by & enter my Vedette giveaway!
Ha ha, really smart, Lisa!
Thanks for the tutorial, very useful ;-)
Thats awesome Lisa..will be making this someday. I have done so many cocoa dusting designs. But this idea, never thought in my mind :( Thanks so much for sharing with us. They look so beautiful.
Pavithra
www.dishesfrommykitchen.com
fantástico!!! una idea genial ;)
Salu2. Paula
Brilliant! I'll definitely give it a shot!
çok ilginç,teşekür ederim paylaştığın için.
You rock! What a fabulous idea...thank you so much for sharing!
Thanks everyone for your sweet comments, I'm glad you liked the tutorial!
xo Lisa
I know you showed this before, they are fascinating! I will have to try this one day! Hope your week is wonderful! Hugs xxx
Awesome tutorial.
Amazing!
you, young lady, are something!! So very cool
OMG those are soooo amazing!!!
Do you think you could spray the cake with edible spray instead??
this is super cool. can't wait to try this on my next birthday cake!
@Anonymous4:
Yes definitely! Edible spray would make for an ever sharper image.
Best,
Lisa
that is a great idea, I think I could make with spiderman etc for my son's birthday. Thanks
Forget the face on the cake, I can't get past the strawberry/meringue/lime/mascarpone middle! YUMMO! ok... the face is also awesome.
kitty
kittyandbuck.blogspot.com
Incredible - Definately the cake you made is better than you could ever buy! Awesome! and the ease of making such a great creation - a work of art. Well done.
Lisa
(Australia)
Hi Lisa! :)
I've got a question: Does this work on confectioners sugar on ganache? Thanks! <3
Kelsey
That cake is sooo amazing. What a great idea with the chocolate face! I gotta copy that next time someone special has a birthday :)
@Kelsey,
I have never tried it on a ganache surface, my worry is it's too "wet" for the sugar to stay, maybe it would melt into the ganache after a while? But I really don't know, I think the only way to know for sure is to try it out :)
Good luck!
Lisa
How fun. Thanks for sharing!
Thank you so much for the tutorial! I made a Doctor Who cake for my husband's birthday using oreo cookie crumbs from the bulk store and it turned out awesome! Thanks again!
Hey Lisa, making this for a birthday party... im trying to prep to make sure i can do it, do you know where i can get a scalpel? also was wondering if you used a high quality paper or photo paper once you got the picture edited? Thanks so much cant wait to try it out!!
@Bren:
You can buy a scalpel at an arts/craft shop, they are not expensive. Don't forget to buy scalpel blades as well, ask the sales assistant to show you how to attach them!
I printed out the stencil on a paper that is slightly thicker than normal printing paper, but it wasn't photo paper. It doesn't have to be high quality, just a little thicker, but not mega thick because then it would be harder to cut the stencil out.
I would love to see how your cake turned out, if you want to email (lisaedoff[at]gmail[dot]com) some photos to me I'll put them on my blog!
Best wishes,
Lisa
Thank you so MUCHHHHH for the idea I tried it & my brother loved it everyone just couldn't get their heads around how I did it. U r awesome & worry not I gave you full credit . Love your blog !!!!!!!!!!!!!
I just did one. Not bad for my first ever attempt at this. I had to use my Stanley craft knife as I don't have a scalpel. Though I may well invest in one if the finished product turns out to be a hit. Thanks for sharing the how. :)
That is just FANTASTIC...I can't wait to do it!!
I have done with vinyl and cut with cricut now got to figure out how to cut cause I upgraded mtc
I've followed your blog for a while now and love seeing your wedding unfold into something so magical!
All the best!
Wedding Dresses|Special Occasion Dresses|strapless bridesmaid dresses
Oh my..this is such a great idea! Can't wait to try it myself :))
xox
www.evesbreeze.blogspot.com
I just followed through with this decorating idea and am so pleased with the results! Thanks so much for such a natural and personalized cake decorating project. Here's how mine came out: http://bit.ly/O5hyY2
I tried this technique on my little one's birthday cake and she LOVED LOVED LOVED it!! Thanks much for a really coooooool idea! I was finally the cool mom :)
@SS:
Aw that's so sweet, I'm so glad you found this idea useful, thanks for sharing!
Loved yr idea I'm def gonna try it out :) it was tots worth reading all of that :) since I throw a lot of parties this will b great to mix up at least one so it's not so similar to all my other ones lol :) appreaciate u sharing that and i think everyone else does too lol :) where did u find that idea anyway?
Thanks again :)
Thanks a great idea. Thanks!!!
I found your cake inspiring and the instructions really helpful - many thanks. Here's what I came up with: http://flic.kr/p/dpqb25
Ooooo such a great and easy idea, Thanks for sharing ;)
Awesome!!
I've been keen to do this for a while now and finally have the opportunity, I used meringue frosting instead of butter cream and will send you some photos of how it came out.
this is great, and the guy on the cake is CUTE! hehe :D
Hi there! What is yous point of view on ads placed on personal blogs?
I love this !
Hi Lisa,
is it possible to post your wonderful idea on facebook page so please send me your answer to: uhrlaub@web.de Best greetings from Bremen/Germany
Ellen
Wow...awesome! I will definitely try this, my man will be so happy :)
Genial!!!!!!!!!!!!!!!! Thank You!!!!!!!!!!
Brilliant! I had great success following your tutorial. Thank you! I wrote about it here: http://under-the-lintel.blogspot.com/2014/01/mmmm-marriage.html
Amazing! thank you :)
Amazing!
Hi Mrs. Lisa. Thank for sharing this great idea! I want to make this for my mother's birthday! But I have a few questions.... Can I still make it on whipped cream frosting (if I put the cocoa at the last second)? Also I cannot make her picture black and white like yours :( Can you give me the link where you have done yours? I really appreciate it! I really would be happy if I hear from you soon, because her birthday is on June 23rd very soon, I have to get ready for it! Thanks in advance! Regards~ Shokhsanam.
Nice cake, nice couple, nice friends. Thank you for sharing.
/A crafter from Catalonia
Post a Comment
Thanks for your thoughts!
xo Lisa
Note: only a member of this blog may post a comment.