
Hi everyone!
Here is a tutorial I've been working on for anyone that is new to photo editing. I wanted to show you two very easy ways to dramatically enhance the colours, contrast and light balance in your photos. I work in Photoshop, but I think that the methods I show would be fairly similar in other photo editing software.
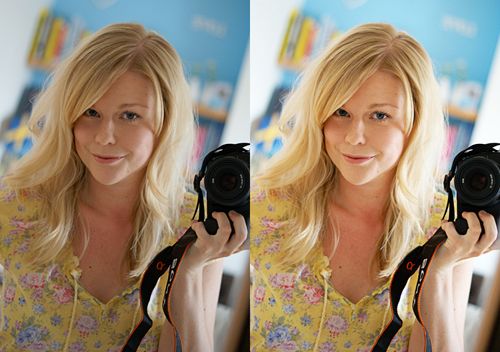
So, if you look at the image above, you can see how much you can improve photos that come out a bit dull and dark, but this is also a great way to make good shots stand out even more!
I am going to use this photo to show you the technique.

The first thing I always do with a new photo is to adjust the Levels. You can find the levels under Image/Adjustments/Levels, or press ctrl+L, or apple+L on macs.
When you have opened the Levels window you'll see this black "mountain". Drag the little black marker and the little white marker so that they are right at the start and the end of the "mountain". Like this:

Click OK. Now you have adjusted the light/dark balance and contrast of the photo!

Now we are going to enhance the contrast further and make the colours really pop. This will be done in the Layers panel, it's usually situated at the bottom right corner of your screen, if not go to Windows/Layers.
Now you're gonna copy the Background layer, do that by grabbing hold of it and dragging it to the "Create a new layer" icon (bottom right of your layers panel).

When you have your new layer, click on the menu where it says "Normal" and change it to "Screen".

Copy another layer by doing the same thing - drag the Background layer to the same icon again - and change this one to "Soft Light".

Now adjust the opacity of your two layers. I usually set the Screen one to about 30% and the Soft Light to 80%. But this is up to you to decide when the photo looks best. Sometimes if a photo is very dark I put the Screen layer's opacity up.

Lastly, merge all the layers by going to Layers/Flatten Image.
Below you can see the photo before and after editing.
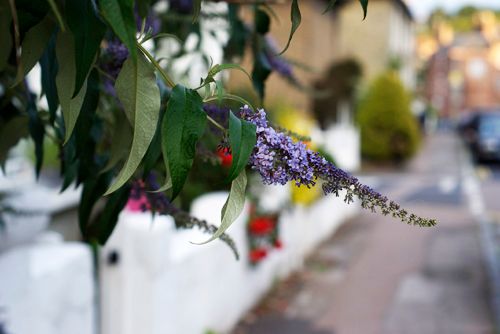
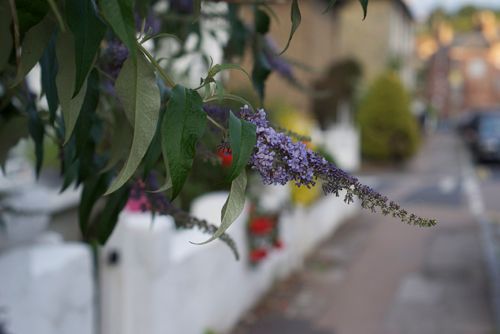
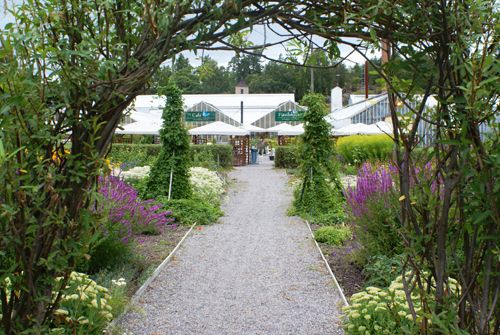
Here are some other before and afters using these techniques:


I hope you enjoyed this tutorial!

WOW! Thanks for sharing this! I am a beginner in photoshop so this was very useful! Please post more!!! :-)
ReplyDeleteOh, I loved them!! Especially the fruit picture. So pretty. Thanks a bunch for sharing!! :))
ReplyDelete-Jocee <3
ok lovely lady! i think i will be back to stalk this particular post because I've been playing with photoshop a lot and use the curves most the time but this is just great info for even the photoshop pros:) xoxo gorgeous photos all the time....i need to get to a farmers market to take pretty fruit pics...enjoy the weekend
ReplyDeleteLooveeely.... thanks for sharing these tips. :) Sea Marie
ReplyDeleteThat was really helpful! I usually rely on film to do that for me, but whenever I use digital photoshop just confuses the heck out of me.
ReplyDeleteFabulous tut! It is amazing how much a little wiggle in levels and curves can make, isn't it? You are gorgeous btw!
ReplyDeleteThis tutorial is great, thank you for new idea ;).
ReplyDeletegood tips. Now I just have to get photoshop.
ReplyDeleteOh wow, I needed this so bad! Thankyou!!
ReplyDeleteThank you so much! I'm often disappointed with how my photos turn out, and I think this'll help :)
ReplyDeleteNifty! I would have never thought of this! Thanks!
ReplyDeleteWOW! Thanks for sharing this! I am a beginner in photoshop so this was very useful! My photos are not really good :( Thank you!
ReplyDeleteThat was so easy - thanks for sharing!
ReplyDeleteThankyou you make it look sooooo easy!
ReplyDeleteThis is so useful! I just did the part with changing the histogram and I am already thrilled with how the picture now looks. Thanks so much!
ReplyDeleteHi there! Just a heads up, you can do all of this in Adobe Lightroom a lot easier!
ReplyDeleteWow, what a great step-by-step tutorial. My pictures already look better!
ReplyDeleteThis is a great post! I will use it for sure on my pictures from now on! Thanks for sharing!
ReplyDeleteOh my God! I love you! Great tutorial!!! You're perfect!
ReplyDeletebeautiful blog! we're following you!
ReplyDeleteOMG! Thank you so much for this tutorial! I've been dying to learn more about photoshop and want my photos to look better without spending a ridiculous amount of time on them. This is amazing and I can't wait to try it out!
ReplyDeleteThis tutorial really opened the world of photoshop to me. It's not as intimidating as it seems now, and I was even able to experiment a little on my own. I tried your instructions on a couple of pictures today and they turned out great! Thank you! And I will definitely be on the lookout for more tutorials you have in the future!
ReplyDeleteAhh cool, thanks so much for this. Am in need of some good photoshop tips.
ReplyDeleteThis is a really great tutorial. I've only been getting around with trial and error mostly :D .. but this is a really simple and informative tutorial! Thanks!
ReplyDelete---------
Gayatri
Look who's Wearing (LwW)
I just tried adjusting levels and voila! You explained it so well. Thanks...
ReplyDeletehow do I get the dreamy look of your image on the top left?
@kathy b
ReplyDeleteThat photo looks like that because it was taken in Photo Booth on the mac, they tend to be grainy. But I will soon post about a program that can easily achieve vintage effects :)
Thank you so so much for your tutorial! its quick and easy! Love it :)
ReplyDeleteNice tutorial! So nice of you to share your technique :) Happened to come across your blog via Pinterest and I have to say it is such a lovely blog! xo
ReplyDeleteThank you for this, I used it tonight and it was super simple and my picture looks awesome. :)
ReplyDeleteSaw this on Pinterest! Thanks, the photos are beautiful.
ReplyDeleteThanks so much for the tips Lisa. I sell things on etsy and this is so helpful to make the photos much more effective! x!
ReplyDeleteMy first thing I learned on photoshop! Thank you !
ReplyDeleteThank you - this is so helpful! I will often use an action to try to improve a pic, but all too often that then looks forced and overdone...this is perfect!
ReplyDeleteGreat tutorial & I love your blog!
ReplyDeleteWonderful info. Thanks so much!
ReplyDeleteThanks I am a beginner in PS5...you can post more like this
ReplyDeleteSandi
Thank you for your posts. I am just starting out and your posts are very helpful :)
ReplyDeletecaught this on pinterest - awesome post, thanks for sharing your tips!
ReplyDeleteYou've done really awesome job! Great tutorial it is, thanks a lot for sharing this nice post with us :)
ReplyDeleteI find photoshop so confusing...thanks for the tutorial, the pictures help so much! Definitely pinning this! Really enjoying reading your blog and look forward to all your future posts! I am one of your new loyal followers! When you have a chance come on by and check out my blog (and make sure to say hi!). If you like my blog, I would love it if you would follow me back! Cath @ Home is Where my Heart is: http://cathhasablog.blogspot.com/
ReplyDeleteThank you so much for posting the tutorial, its genius !
ReplyDeleteWhat version of photoshop are you using?
ReplyDelete@Kristine:
ReplyDeleteI use Photoshop CS5.
Great tutorial! I just used it on a photo I was trying to edit for scrapbooking. Thank you!
ReplyDeleteAwesome tutorial Lisa! please post more stuff like this as soon as possible sweetheart!!
ReplyDeleteWhat about photos that are to bright?
ReplyDeleteB O O M ! Thanks for your awesome tutorial. Loving your fabulous blog too.
ReplyDeleteYESS! Thank you <3 I have been looking for good simple edits for photo like this :)
ReplyDeleteYou are awesome! Thank you so much for posting this. :)
ReplyDeleteLooking forward to more instructions on adjusting photographs. I use PAINT SHOP PRO (x5yrs)and have never used LAYERS but I think I can do the same on my program.
ReplyDeleteI look forward to learning more tricks to improve my photographs as I am getting a new point and shoot camera. I often end up shooting pictures in no flash situations and this will help.
Thank you
NOnnie
Did you ever think of doing a podcast.. this would be an interesting topic.
ciao io ho paint shop pro, se clicco CTRL+L mi compare un altra cosa, mi puoi aiutare?
ReplyDeleteITALIANO
grazie!!!!
@Nonnie:
ReplyDeleteThank you for the podcast idea! :)
@Anonymous:
I don't speak Italian.
Thanks so much for this awesome tutorial! I'm new to Photoshop, but I love using this technique now :D
ReplyDeleteThanks for that! I never knew and I'm sure my jewelry will look better thanks to you!!
ReplyDeleteThank you so much everyone for your kind words, I'm so happy my tutorial has helped you!
ReplyDeletexo Lisa
lovely post..Thank you so much...
ReplyDeleteNice. This is an excellent source of information. I like your blog. Thanks for sharing this blog.
ReplyDeleteThank you so much for sharing this! SO helpful!
ReplyDeleteThanks! I use Photoscape (very basic editing program - fewer options than Photoshop, but quicker and less complicated when you don't need to do much) when editing most of the photos I take for my blog. I don't have a nice camera or anything (our digital is 10 years old!) so I'm not worried about making them artist-quality, y'know?
ReplyDeleteBut the same basic concept works even in that, by clicking the auto-contrast and auto-level buttons. Sometimes just that can make a huge improvement!
This is really fantastic. I have already learned some Photoshop techniques on my own from messing around, but this is a tool I'll add to all of my editing! Thanks so much!
ReplyDeleteGreat tutorial! I love how you’ve packed a lot of helpful information into a short list! Thanks a lot
ReplyDeleteWOW!! lovely done.Specially the cottage picture.
ReplyDeletehi,just want to ask if you're doing your illustration by hand or computer? :D
ReplyDeleteI really love your Photoshop tutorials. I'm slowly learning Photoshop, so all the tips and tutorials the better! Thanks!
ReplyDelete@wan saiyidatina aisyah:
ReplyDeleteHi there, I draw most of my illustrations by hand, then I scan them in and put them together with text or whatever the design might be in the computer. Sometimes I draw with the pen tool in Adobe Illustrator.
Best wishes,
Lisa
Wow! Awesome. I release that in movies every picture is comes from Photoshop. Thanks for sharing these great photoshop tutorials
ReplyDelete.
Verry usefull for making average pictures awsome. thank you Lisa ... I will put this post to my favorites :)
ReplyDeleteGreat to know the -- in depth from this blog.This will really help for my forward steps to be taken.
ReplyDeletedigital image editing in groupdmt
-->Clicked through from Pinterest and this was VERY helpful. Thank you!
ReplyDeleteDeb
www.websavvymom.com
Thank you for your blog! My wedding photos weren't edited at all and I am very new to photoshop. I was wondering is there a way to process all my wedding photos with this method at once? I'm using elements 10. Thank you for your post, you've made my wedding photos truly pop!
ReplyDeleteI am newbie in Photoshop and designing world. But my company has 30 years of experience. So i feel so lucky as a new comer i have found your stunning creation, tutorial by which i can able to explore me. Admittedly it helps ma a lot. Plenty Amazing !!! :)
ReplyDeleteJust came across your informative tutorial on Pinterest and tried working through the steps. As I am a total newbie to Photoshop Elements--and in spite of your great directions--I found myself a bit befuddled. Any chance you'll do some video tutorials for the more inept among us?
ReplyDeleteThanks for freely sharing your expertise.
I should add that I successfully managed the first step; it's the layers that got me.
ReplyDeleteDebra
Thank you SO much for this Tutorial!!!!! I´m a bloddy newbie with Photoshot and honestly this is my first trial wich turned out great! Thank you!!!
ReplyDeleteThis is such a great tutorial. :) I pinned this awhile ago and came across it again today and it really helped with some photos I recently took. Thanks so much!!
ReplyDeleteGreat tutorial. It'll really help me with my photography editing. Thanks. =)
ReplyDeleteGreat tutorial !! Thank you lisa!!
ReplyDeleteVery good tutorial. Learned a lot. Thank you.
ReplyDeleteFabulous! Thank you for sharing :)
ReplyDeleteIt'll really help me with my photography editing.
ReplyDeleteAwesome photography……..the only thing I don’t like about them is that I didn’t shoot them.
ReplyDeleteAwesome tutorial
ReplyDeleteAwesome!!!!!!
ReplyDelete